Monday, August 23, 2010

The Penny Office Depot Pencil boxes are back! With a twist this time...

So with the back-to-school sales, Office Depot is selling one penny pencil boxes again (The black ones I posted about last year made great snoots for my sb-600/800's)! Yay! But here is the thing, this year they no longer have black color ones, only bright kiddie type colors. I was bummed when I noticed this, but this year they replaced the black ones with clear ones!

So when you're given lemons, make some lemonade, right? These clear ones make for great quick light diffusers! putting it on just like a snoot it works great for blasting light in all directions, up, left right front back etc! I tested it and it was very effective on my green frog, providing a nice catch light while pushing a lot of light straight up. Noticing this, plus thinking about what to do with the insert part of the pencil box, I cut the end off and put a small piece of aluminum inside to stop light from going straight up. Now the light pushes back down reflecting around more and hopefully diffusing a little better. It greatly controlled upward spill. One could take this even further and make a curved reflector inside the box part so that light would only push out of front and sides, or even just the front.

Here is a shot of it lighting up my froggy test subject.

So for only one cent you can have a nice diffuser that won't look too ghetto, ala the David Hobby soup container. It also won't break the bank and cost as much as a Fong whatchamacallit. Just think of how many of these you could buy for one of his! (btw, limit is 3, so hurry up and grab some while you can!)


Monday, August 9, 2010

Hanging out with Joe at Dobbs Ferry...

Joe McNally at Dobbs Ferry

There are very few workshops that I ever get excited about, but when it comes to Joe McNally my ears will perk up. His working career is just amazing to me and a feat that will never be done again as the print industry is gone as we knew it. The previous year Joe had these one day workshops where you hang out and learn while Joe goes through lighting setups, solves problems, and then lets the attendees shoot his lighting solution. A great bargain for the money considering his 15 to 1 ratio, and the fact you get to listen to his colorful stories about hanging out his helicopter or freezing this body part off. I hesitated that year and regretted it.

So this year when the chance came up, I really wanted to make it out there. Then to make it even more appealing Joe created an advanced workshop pushing things further, and quite frankly something more up my alley. The advanced workshop covered high speed sync, multiple exposure, some advanced lighting techniques as well as mixing big and small light. I really wanted to sign up, and when my friend Piotr was able to go it was a done deal!

So what did $500 get us? A great deal in my opinion. We spent well over 8 hours with Joe, chatting with him and admiring his lighting and camera gear and well run team of friendly assistants. We had a great lunch and ample water to keep cool during the day. We also received a nice bag of swag from his sponsor friends! Just the 10 hours listening and watching Joe do his thing was well worth it, everything else just made it priceless.

So we arrived at his old former studio, a great space with tons of character and Lynn greeted us. I'm not usually an autograph nut but I always thought it would be fun to get Joe's not in the typical book format, but on a lastolite trigrip, one of his favorite lighting modifiers. So both myself and Piotr pulled the trigrips out and he graciously signed them for us.


He did mumble a funny comment after signing friend Piotr's, "Just wasted a perfectly good modifier". He asked for him to sign it big and use the whole space. I'm kind of glad Joe said that, it totally fits his character, plus I thought my friend was crazy too!

So we unloaded our gear and Joe did his introduction as well as having us introduce and tell what we were interested in exploring for the day. After that Joe gave a short presentation of some of his work, filled with his colorful back stories to every image.

After that we jumped into the studio and started working light, small light and big light.

Katherine Jumping


Joe in Action


He showed us a few of his favorite techniques, created some problems then solved them.

After lunch we went into a blacked out area for some long exposure action! Joe set up for a multiple exposure 2 frame shot with the beautiful Maria Arce, a model/stunt woman/martial artist/actress etc etc..

Maria Prepping for a double exposure


Maria in Motion


I captured these BTS shots handheld doing very long exposures, 2 to 4 seconds, stealing Joe's main flashes to expose my shot. By doing this I could get somewhat sharp images while having a Camera held up against my body for 4 seconds long.


I tried a similar series using a friend in an Indian Sari during the winter and had many technical issues with it, so when Joe ran into similar problems it was great seeing how he troubleshot things. Eventually he punted on the multiple exposure and went for a single exposure with rear curtain pose.


After we wrapped that up we moved into the last 2 hours, which Joe said was our time. He grouped us into 4 people and sent us out with a model and any lighting we wanted to use. We had two 1 hour sessions, 1 model per hour, and four photographers to taking turns. I was happily suprised that Joe ran things the exact same way I do when I give workshops. He has the same belief that to be a better photographer you need to understand how to properly assist and understand the lighting. Group shooting was a big no-no as well as he said only the photographer should be shooting, and that he'd fire an assistant on the spot if they were shooting between him during a shoot.

We started with Phil, a great former cop with a very character driven face. Super nice guy and very easy to work with. I chose to go the CTO route during my turn and change the mood of the glass roofed room.


Meet Phil


During the next hour we switched to Christina, a great young model with a firecracker spirit. One light in high speed sync for the first shot, then went to a 3 light setup on the lower one. She was great and posing and hard to keep up with how fast she could change her expressions.

Christina W - Emmanuel NY Models

Christina W - Emmanuel NY Models

At the end of our day Joe mentioned there would be a surprise on the rooftop, He told us that anyone that wanted to stay late could join him on the roof while he shot Maria doing jumps in the sunlight while Joe tried to fight back with 6 sb900's and high speed sync. Who wouldn't jump at the chance! So after an interesting tour of the building, Joe took us on the scenic route to get to the roof, we arrived up top where it was broiling hot.

Here are a few shots of what Joe was up too..


Butt kicking jump shots!

Maria in Flight


All in all an incredible day with the master of flashes big and small. The rest of the weekend continued to be exciting as we scheduled a model shoot in the city. But I'll save that for another time...

Thanks so much to Joe and his incredible staff, best workshop ever!!


Friday, May 21, 2010

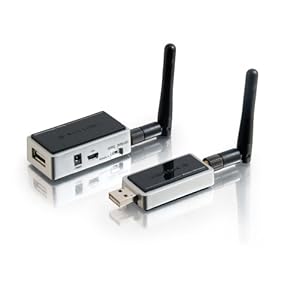
New version of the Wireless USB adapter available....


I just found out a new version of the wireless USB adapter is available from Cables Unlimited, which would explain why availability of the old one had been drying up. The updated information came from a readers blog that built one using the newer trulink device, thanks Justin.

The build should be the same, the packaging of this unit is more elegant then the previous, and it has external antennas which could be useful. It will however still require an external power pack. Also the price seems to be a bit higher.

Sunday, February 21, 2010

Need seamless paper? How about a 100ft (update:225 ft!) roll for the same price as 36ft?

For those photographers looking to shoot with seamless paper, this might be a deal for you if you're looking for white and not the 107" size thats so hard to transport anyway.

I wanted to buy a roll of regular seamless and when I noticed the typical 53" roll contained 12 yards and ran about $35 shipped, I thought to myself that paper in that size should be cheaper. And it was. I remember buying some plotter paper and I knew the rolls were bigger then just 12 yards.

So I did a little research and found this deal, HP Universal Heavyweight Coated Paper (60 Inches x 100 Foot roll) for just $17.95 + $16.46 shipping or about $35. Whats great is that you get 64 feet more and its also 7" wider!

Here is a link to the 100 foot roll I ordered from amazon,


UPDATE, there is this roll that is 225 feet long with free shipping, dunno how long it will last.. (link below shows a different price, but when I click on it it goes to $17.99) YMMV


If the 225 foot roll price is still high, this is a 150 foot roll (its not heavyweight however) someone else found on Amazon..


The paper works great, its a nice bright white and I like having the extra 7" to work with side to side. I'd prefer 107" when shooting but its just not practical for me travelling. This deal works out great and I have plenty to spare! Actually, I split the roll with some other photographers so we all have some white seamless now.


Sunday, February 7, 2010

The $2.99 laser trigger


(laser not included!) Its actually an IR trigger, but lasers are so much cooler! I wanted to trigger the camera to very specific action so I thought i'd get an optical trigger. There are a few commercial ones out there but as a fun hobby project (I love repurposing equpment btw) I thought this toy RC car lap timer would make for good inexpensive optical trigger. After adding a plugin jack and a diode, I had one that will trigger my pocket wizard which in turn will trigger my D300.


The lap timer is actually made for the Radio Shack ZipZap mini rc cars. They can be found for just $2.99 shipped on ebay. I comes with the lap timing scoreboard and an IR beam railing for the opposite side of the lane. two AA's power the lap timer, and 2 AAA's power the IR emitter bar. You can use the emmiter bar to make a beam for triggering. It works well but the object needs to be big enough to completely block its wide range. The laser level I'm using on the otherhand has a very tight beam, and even a single water drop passing through its path can trigger it.

While testing the stock unmodified lap timer I noticed that the Red LED on top would turn off whenever the beam was broken and be on when the IR beam was seen by the timer. So I decided to do a quick modification by adding a diode and an 1/8" (3.5mm) mono connector. That would allow it to connect to a pocket wizard transmitter.


The transmitter would trigger my DSLR with the addition of an inexpensive pre-trigger cord from Calumet (it was $9.99)


For the Canon folks...


Here it is in action, this is reject test shot that happens to show everything. You can see the laser on the right side, my water dropper in the middle, and the laser trigger on the left. The drop broke the beam, and traveled the distance seen when the camera shot it. For those needing a poor mans adjustable delay and using flash (in a dark room), one trick you can do is rear curtain sync. By syncing rear curtain you can adjust when the flash goes off, and in turn creates your exposure. If you need more discrete timing you'll have to build an adjustable delay (I've done that too, but thats another blog..)


A prettier example of it in action. using this method I can get pretty repeatable drops in front of my camera. Not the most exciting use of this trigger, but it shows it works and is repeatable.


Here is another example of the trigger, I had another photographer "spray" the camera with a card ala 52 card pickup. The laser trigger was in front of him, and I prefocused the camera so that when the cards did break the beam they would be in focus. We did a this a few times and got pretty good results, I plan on doing some more exciting triggering once things warm up and I can get outside.


All in all the trigger has been a success, it looks a little funny, but hey it cost less then a happy meal and now I can trigger things like the cool sharks in Austin Powers!


Wednesday, October 21, 2009

Possible new Tether power source

So while at Radio Shack I saw this on clearance for $9.95


I picked one up and hopefully I'll run some tests on it, I'm thinking it might be useful so long as I keep the power jack available to use regular batteries in case this thing dies. (proprietary batteries are a pet peeve of mine unless I have a spare or 2 or 3) Based on the 5.2v spec and up to 500mah draw it might work, but real testing will tell the tale. Also I have a bunch of interesting projects in Draft mode, but I haven't had the time to post them, Soon though as its getting cold here in Chicago and I won't be able to shoot outside as much!

Friday, July 31, 2009

I got Schmapped!


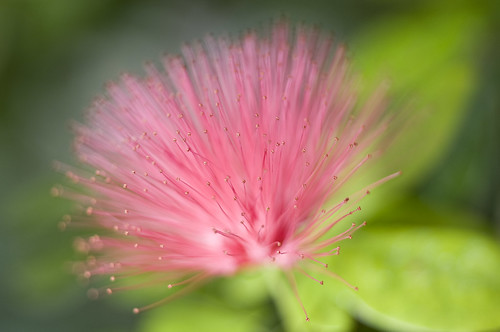
So early in the year I went to Garfield Park Conservatory to try and work the light and get some pictures that had the feel I wanted them to have, not the way they were actually lit. It was rainy and cold on the day I was there, a very flat cold light. So I gel'd up and tried warming things up in different ways, some worked some didn't. This shot was just a quick snap I took of powder puff tree in full bloom. I flicked a little light with my strobe on a stick and snapped off this DoF shot. I liked it as I thought it looked like a fireworks explosion. Well fast forward to a few weeks ago, and Schmap contacted me about it asking if they could use it. Flowers are not something I usually shoot or usually have an interest in shooting, so I was suprised anyone even noticed it. Well I guess they picked it and put it into their guide. I'm okay with them using it since I consider it a snapshot and not my more serious work.